December 31, 2012

Top 10 of 2012

This year was our first full year blogging and we had a blast doing it! I especially liked hearing from friends and readers about things that they would like to see and DIY's that they would like to learn how to achieve. You gals are all so inspiring!

Here are the top 10 posts that you enjoyed reading this year:

December 30, 2012

Marissa's Quarter Century Party

Yesterday was my 25th birthday and I decided to hold an EPIC Quarter Century Party to celebrate! I was REALLY excited (hence the all caps) because having a birthday around the holidays means that people aren't always available, but thankfully they were this year.

I started preparing for the party by taking down all of my Christmas decorations then I got crafty with my birthday decorations. Below are the wreath and miniature tree I decorated in my peacock theme.
"25" peacock wreath I made of glitter foam, peacock feathers, and beads.

Mini peacock tree!

Aren't these little birds cute? From Jill's Addiction.

Paul made me a DELICIOUS cake and my super artistic neighbor Heidi decorated it. I couldn't have imagined it better!

I also received a few crafty gifts including this scarf which my friend Stephanie made for me! She found the idea here at Little Treasures.
Thanks Steph!
And Krista thrifted for this cute little number, with the tags still in it, originally from Target!
And everyone stuck to me color scheme!

December 26, 2012

Gifts

I hope that you all had as wonderful of a Christmas as I did! Paul and I were able to spend multiple days with each of our families, attend church multiple days IN A ROW (!), and share gifts with our loved ones. Below are three of my favorite gifts that I received this year.

Dritz Dressform
Watch for more sewing soon!

Personalized Sewing Labels

Paisley Infinity Scarf
from Desiring Joy.

Christmas Revolution Gift Cards
to spend on one or more amazing charity!

I also made the below hand sewn gifts for family members. Did you make any gifts this year?

KitchenAid Mixer Cover

Fleece Bathrobe

Bow Clutch
Also for sale on my Etsy

Chapstick Key Fab
Also for sale on my Etsy

Infinity Scarf
Also for sale on my Etsy

Family Picture Hair Chignon

EVERY YEAR we are expected to take a family picture together, and this year was NO different.
So, here we are Christmas day with family over, pajamas still on, when we realized we hadn't taken our family pictures yet.  My day old hair was a little flat and lifeless and I wasn't sure what to do with it when I remembered this pin from Pinterest which depicts how to create a low side chignon.

So, being that I had little time and didn't particularly care I skipped numerous steps such as teasing my hair and curling it. Lazy right?

It didn't turn out too bad, or take too many bobby pins. I would do it again!  How does it look ladies?
Back

Side-- Wish my ear wasn't showing. Guess I'll fix that next time.

Front

December 25, 2012

Antique Button Bracelet

Each Christmas, once we've read the Christmas story, all the gifts are opened, and nearly all of the food consumed, the women in our family like to visit while we do a craft. This year my sister Karen brought an antique button bracelet craft for us to assemble.

If you would like to make a similar bracelet you will need:

  1. 20-25 buttons
  2. 20-24 inches of 1/8" elastic
  3. 20-25 medium safety pins
  4. 40-50 small beads
  5. 40-50 pony beads

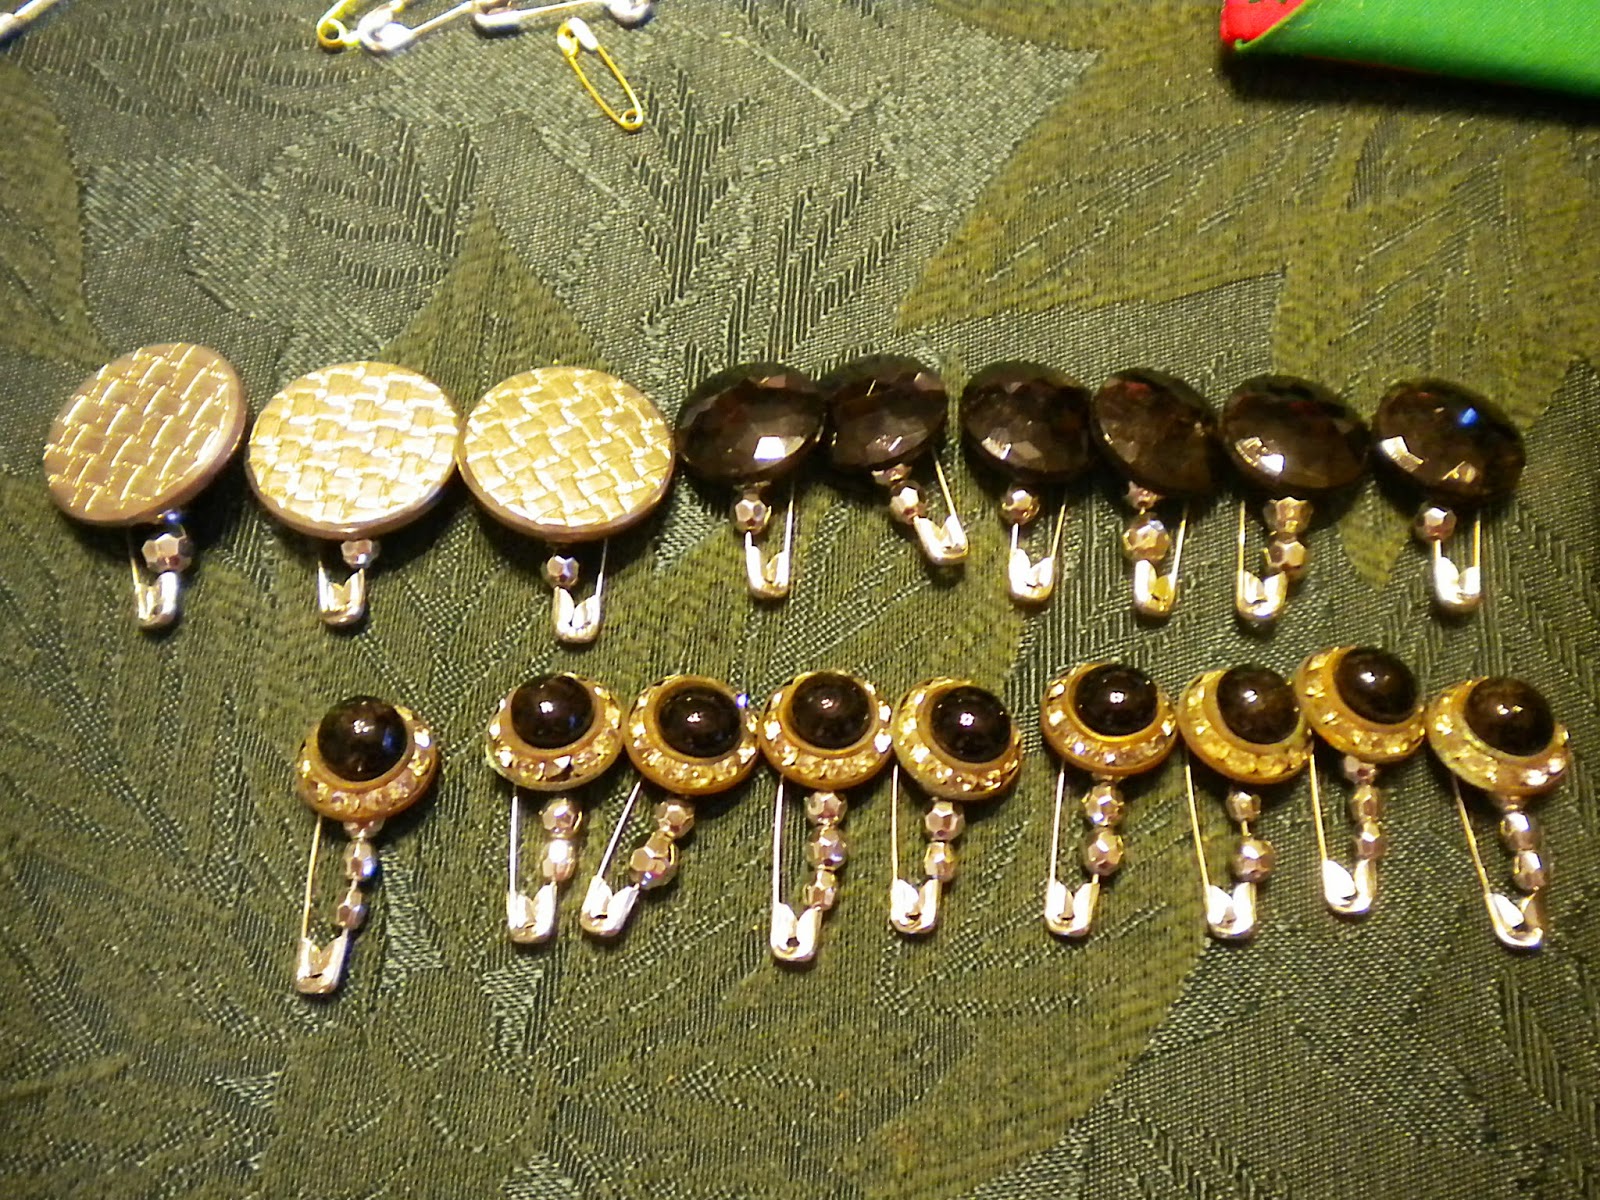
Step 1: Put one button at the end of our safety pin. Then add 2-3 small beads to keep button at the end of the safety pin.
Safety pins with buttons and pony beads laid out to be threaded.

Step 2: Cut two equal lengths of elastic, both slightly longer than your wrist. Thread one piece of elastic through the circular end of the safety pin. Thread the other piece of elastic through the closed, pin end of the safety pin.

Step 3: Thread one pony bead on each elastic piece. Next, add another safety pin with button to each of the elastics, upside down. Continue in this pattern, adding safety pins with buttons in opposite directions, until you have used all of your safety pins with buttons and the elastics wrap around your entire wrist.

Inside of bracelet.
Step 4: To finish bracelet sew each piece of elastic together at the ends.

Finished product. Great way to display and enjoy your antique buttons!

December 23, 2012

Advent Adornment

The Advent wreath has been a part of the Christmas tradition since the 15th century. Advent is a time of reflection and waiting. Here is the advent wreath that I had the honor of preparing for our church this year.

The wreath developed after I had a chance to view the Advent graphics that would be used at our church. I was impressed with the simple lines and colors that I saw and decided that often simple is best. So tried to mimic the graphic with materials that would be readily available locally.

I started with the traditional green wreath to represent eternal life. I added red grapes and grape vines remembering that Jesus referred to himself as "the vine" in John 15. The wheat element is actually an ornamental grass because I didn't have any wheat available and this grass had greater impact from a distance. Wheat of course is remembering that Jesus is "the bread of life" as noted in John 6. The black frame is actually a black serving tray covered with black scrapbook paper. I used crayons to create the chalk board look. The plate is supported on a picture easel that fits inside the wreath.

Today was the fourth Sunday of Advent so all of the candles have been lighted. They represent Hope, Preparation, Joy and Love. Tomorrow we will light a white candle to represent the birth of Jesus our Saviour.
 

"Look, the virgin shall conceive and bear a son, and they shall name him Emmanuel." which means, "God is with us."

-Sheryl

December 10, 2012

Waste Not, Want Not

This picture makes me laugh every time I see it. I remember the colors and textures of these outfits so clearly. I am the one on the right and my sister (also crafty) is on the left. We were all set ready to walk to church on Easter Sunday. We are holding Easter chickens in our hands.

My mom (Helen) was often given clothing and fabric from people that knew she knew how to sew. She turned those hand me downs in to the very most fabulous things. She never wasted a thing, and we very rarely "wanted" for much. The jackets were wool that was reborn as children's bolero style jackets. Gloria has that added little detail of a rabbit because she was only a four year old in this picture and it made the jacket more age appropriate.The skirts were also down sized adult pleated skirts. The only thing that she did not make were the Easter bonnets and even they were cleaned up and a few artificial flowers added. Don't you wonder what was in those purses?

December 2, 2012

That Cheetah Dress: Casual


Out of all the ways I choose to pair this dress, this is my favorite. It is so comfortable and applicable to many situations. 


  I realize this outfit is a bit monotone, but with the print of the dress it doesn’t really NEED a splash of color like other outfits might. I specifically like the pearls mixed with my vintage ivory colored beads.
Notice the design of my sweater? I hate when sweaters get all caught up on my rear. Solution: buy sweaters that are shorter on the back and don’t get caught up. Who wants to look like they have a shelf butt?

Honestly I'm feeling a little modern day "Flintstones" in this one. Love it. 

December 1, 2012

That Cheetah Dress: Classy

One of the most obvious ways to wear a cheetah dress: with a black blazer. I'm sure this combo comes with no surprise, but I just HAD to post it. Would you believe the blazer and dress came from Goodwill? I  love the Goodwill in my home town.

There are so many things I could have done with the jewelery here, but went for a blank slate instead.
 I want to hear how YOU would accessorize this!


BOW CLUTCH WINNER


And the winner of our bow clutch give-a-way is Kayjayleh, our 7th blog follower! Please send me your mailing address Kayjayleh.

Thanks everyone for the follows and we hope to see you soon.

November 30, 2012

That Cheetah Dress: Leather

How to wear that cheetah dress? Leather. Leather is usually... correction: ALWAYS,  hot with cheetah. 

Here is how I paired the two. 

A tough jacket with this flirty outfit. Totally me.

Hind sight: Should have added my hoop nose piercing instead.


Bulletin board


I don’t know about anyone else, but I am one of those girls who like to continually go above and beyond, so when I realized there was NO decorations for Thanksgiving at work I HAD to do something about it. What did I have available? A roll of yellow paper and a few markers. 

In other words, I was working to make two ingredients into a whole meal.
Bad analogy? You’ll deal. 

Anyway, if any of you care here is what I ended up throwing together in the 30 minutes I had, and a pictorial view of what I did.


Step 1: Sketch the cornucopia
Step 2: Color in/ Shade the cornucopia
Step 3: Add background items

Step 4: Start adding foreground items
Step 5: Continue adding detail
Step 6: Fill in any yellow places left with gray
Step 6: Another  example of filling in "white space."
Step 7: Add shading to anything else you want. I added a little more yellow shading to the under side of my cornucopia
Step 8: Add acorns. Just do it.
Final Product. Make due with what you have!
Now that's the spirit.