August 27, 2014

Blogging Break

Which do you want first, the good news or the bad news? Good news? Ok!

I'm going back to school to get my graduate certificate in philanthropy!

Bad news, I'll probably have a lot less spare time to blog so you'll see fewer posts from me for a while. But don't fret, I'll be back ASAP!

Headed in to my first class. Here goes nothing!

August 4, 2014

Send Grandpa and Me to Washington DC

Over the weekend I learned that my grandpa and I were chosen for an Honor Flight to Washington DC in honor of his military service. His way will be completely paid for, but I need to raise $500 to accompany him. I will be using all the profits from my Etsy shop for the trip. Would you like to help send me to DC? Click here and go shopping!


July 31, 2014

Sea Fan Wall Art

Today's post is written by my guest blogger and very artistic cousin-in-law Heather. After I saw how BEAUTIFUL her sea fan wall art turned out I knew I needed to share her tips and tricks with all of you. If we're being honest with ourselves, don't we all have a baggie of found sea things that we should be displaying? I know I do!


Heather's Sea Fan

Other materials needed


Materials needed:
Seashell or sea fan for center piece
Picture Frame (I chose a raised/shadow box picture frame)
Scrap book paper of choice
Acrylic paint (optional)
Paint brushes/foam brushes
Heavy craft glue

1. Paint a thin layer of mod podge on top of the sea fan to let it dry. If you are working with a fragile sea shell, you can do the same to strengthen it.
2. Select picture frame. Paint it to color (if needed) and let dry.
3. Cut out a piece of scrap book paper to fit inside frame/become the back ground for the shell. You can paint highlights/accents on to the scrap book paper if desired.
4. Once all pieces are dry (sea fan/shell, picture frame and scrapbook paper) assemble the frame with the scrap book paper in place of the picture.  
5. Glue the sea fan to your frame/glass. The frame I chose is a drop shadow frame, however has the glass flush against the backing. Because of this, I decided to glue the sea fan on top of the glass, centered. If your glass is raised to the top of the frame (leaving space inside the frame/box for a shell) you will need to take an extra step of gluing the scrap book paper to the backing. To do this, you’d want to paint a thin coat of the glue to the back of the scrap book paper and adhere to the backing of the frame so the scrap book paper is strong enough to hold up the shell. Once done, then you’d glue the shell to the scrap book paper).
6. Let your pieces dry and enjoy!

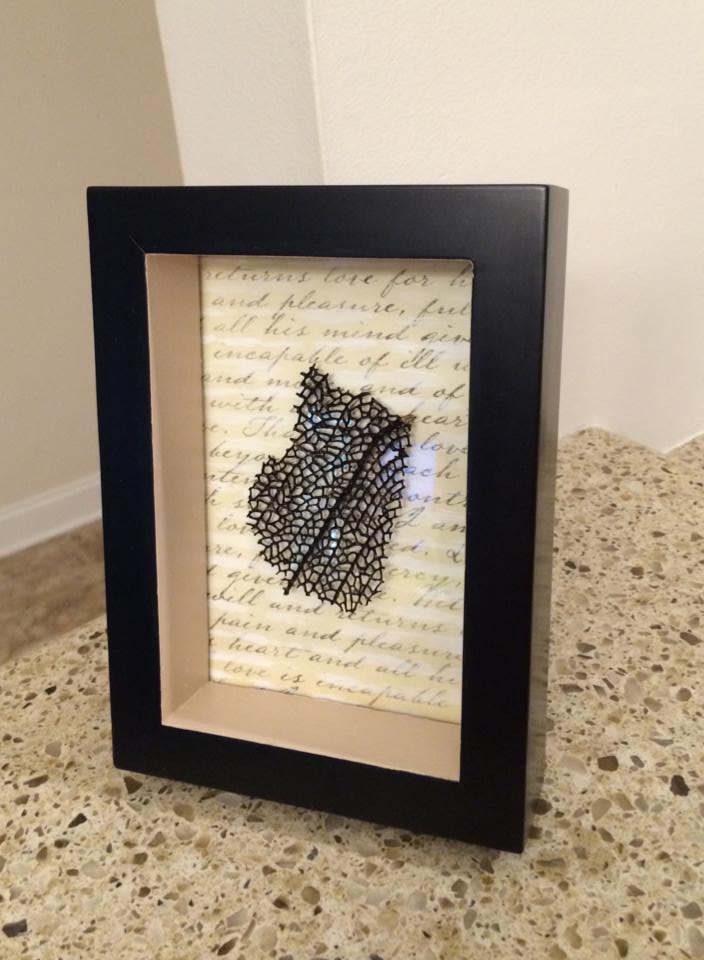
Her finished product!

July 21, 2014

Baby Shower Gifts

One of my dearest friends is having her first baby girl (!!!) so I did what any rational friend would do and locked myself in my sewing room for the day, played a few Christmas movies, and sewed frilly things!

I started with a onesie I bought at Target and some perfectly colored remnants from Jo-Ann's. I wanted to add ruffles to the butt and found this super quick tutorial on Shabby Mom of 2.


I know kid clothing items tend to get washed A LOT, so I think if I were going to do this again I sew each ruffle in a tube shape them turn them right side out before attaching them so all raw edges are inside. I'm a bit worried that the unfinished edges on the under side of these ruffles will fray. But maybe baby girl will have out grow this little number by then anyway!

I had quite a bit of material left over so I cut two rectangles, the same size, and sewed them together at the sides. Then I added a pocket on top, inserted elastic, and hemmed the bottom. Wa-la, 20 minute skirt!


I also added a personal label to this special piece. So glad my mother gave them to me for Christmas a few years ago!

This special outfit still needed a finishing touch and I had some pink and white stripped material left so I found this fabric flower tutorial at Scattered Thoughts of a Crafty Mom.


I love how all of the pieces came together and can't wait to see baby girl in this outfit!


July 13, 2014

Crafts with Krista

This weekend I went to Michigan to spend time with my sister and she had a fun craft planned for us, state art! First we went to Michael's to get scrapbook paper that coordinated with our decor then we went to Ikea (!) to get frames.


Krista printed out our states, Michigan and Indiana, on copy paper. We cut our states out and traced them backward on glitter paper.


It was very important to double check and make sure that the states were traced BACKWARD onto the glitter paper so the glitter would be face up and the state correctly oriented. Then we cut out our states and a heart in a coordinating color.


Next we glued the states and hearts onto the backgrounds.


Some masking tape, pop the hangers on, and replace the back. Craft complete!


Once I was back home I eagerly hung my new art. I chose to do two states, one for both places I have lived as a married lady.


This was a super simple project with big impact that anyone could do. I would highly recommend you give it a try! (Please ignore our dinosaur television, it just won't quit!)

July 9, 2014

Hot Pad Bowl

Do you ever burn your hands taking a hot bowl out of the microwave? Me too! I touch it lightly, decide its okay, then make it about half way across the kitchen before I can't decide which counter is closer and nearly drop the bowl.

Thankfully, over the weekend my aunt gave me a set of hot pad bowls. I had never heard of them before but now I can't imagine using the microwave without them. My aunt used a pattern similar to this one I found at 2 little hooligans. It is very important to use all cotton material, batting, and thread for this project. Happy nuking!


July 7, 2014

Worth the Work

Porch sitting is one of the summer past times that I most enjoy. I rarely have time that I feel I can spend that way. I have found that if people join you in your porch sitting it is even more enjoyable. I decided I needed to acquire more seating for my porch so more people could join me. 

This is what I found on one of our treasure hunts one Saturday morning. I knew it would take some work, but the price was right. Hello my sweet lil' glider.

"New" glider

 This is an example of what I had to work with. Many spots the wood was bare and many of those spots had some mold too. I knew I needed to be cautious with the mold. Protective garments, eye and respiratory protection were a must.
Lots of weathered spots

 I found it easier to take a bucket of bleach to the mold before I finished dismantling the entire thing.

A little muscle power and a scrub brush is all it takes

Here is what the frame looked like when we had it mostly dismantled.
Lots of spots of surface rust

 The process involved  tearing the entire thing apart, sanding, scrubbing, sanding some more, priming, and then painting. It took a number of days to complete the process because I did one step each evening after I got home from work. When I got too tired I stopped working. It was worth the investment of time and energy. It is a welcome place to drink a cup of coffee in the morning and listen to the birds.


Here is the finished product. It has already weathered a couple of bad summer storms this year and came out wonderfully. Sometimes it is worth it to invest in some paint. I hope you too get a chance to sit and drink a cup of coffee and listen to the birds.

June 27, 2014

Side-by-Side Challenge: Shoes


This month's side-by-side challenge, hosted by 2 Girls in 2 Cities, was SHOES! Stop by these ladies blogs to see how to wear this summer's hottest trends.

Lisa - Sisters Marie
Jalpa - Samosa Pop
Kristyn - First Impressions

June 24, 2014

Thrifted Summer Kicks

In my recent thrifty styling posts I mentioned many thrifted heels and sandals so I decided to share my FAVORITE thrifted pair with you today. I purchased these Miss Bison peep toe heels from Goodwill last fall for only $4.04 and am very excited the weather is finally warm enough to wear them! This classic color and wide and low heel combo make these heels easy to wear to work and out afterward. What are your favorite summer heels?


*Please excuse my sweaty feet marks!

June 17, 2014

What She Will Wear: Wedding Guest Attire

I was eager to try styling my final dress and hand bag from the moving sale since I plan to wear them to an evening wedding later in the summer. Here I paired my cheetah hand bag with a cheetah belt, blue cardigan, and previously thrifted heels.


I just LOVE that this classic black dress from The Limited has pockets! How would you style it?


June 16, 2014

What She Wore Monday

After a casual Friday and weekend attire I was glad to hit the ground running Monday morning with another new-to-me outfit. This classic red sheath dress from The Limited can be worn to work and easily transition to any after work events I have planned. Today I paired it with a gray blazer, pendant necklace, and previously thrifted heels.


June 12, 2014

What She Wore Thursday

We were giving a special casual day at work on Wednesday (I'm not complaining!) so today was the next opportunity I had to wear one of my new finds from this past weekend's moving sale


Today I wore my new thrifted blouse, vintage bag, and previously thrifted flats (which are hard to see in these pictures. Promise they're cute!).


I am also wearing makeup samples from Real Purity. I was very impressed with the makeups color and longevity, especially for organic makeup! You can request your own free samples from their website here and will only pay shipping. Sure beats paying for one of those sample box subscriptions! #winning


*This post was not sponsored by Real Purity. I simply want to share my fun finds with you!

June 10, 2014

What She Wore Tuesday

The weather was a bit warmer today and I was excited to try my new bright floral spring dress. Paired with a cardigan and heels this dress made a perfect work outfit and will surely be worn many more times this seasons. The cardigan and heels were both previously thrifted too! What are your favorite thrift store finds?

June 9, 2014

What She Wore Monday

Just like the first day of school I was excited to start this work week off in one of my new finds! I styled my new striped and beaded Gap top with green jeans, a brown belt, brown sandals, and a brown bag. I have recently been enjoying mixing my neutrals, gasp I know, both blacks and browns and was very happy with this look. Do you mix your neutrals?


June 7, 2014

Moving Sale Marvels


Today my mother-in-law and I came across the most wonderful moving sale! It was half off day and the previous owner of all my special finds seemed to be exactly my size. I had to be selective to only end up with these!

The Gap $2.50

Ann Taylor LOFT $4.00

The Limited $7.50

The Limited $4.00

Banana Republic $2.50

Vintage $5.00

Nine West $5.00

All of these finds, in great condition, cost only $30.50! Stay tuned to see how I style them.