May 30, 2014

The Sweetest of Things

One of my nearest and dearest friends recently opened an Etsy shop, The Sweetest of Things. She makes the most adorable toy totes in a variety of sizes. Head over there now and check out her shop. Your kid's rooms have never looked so clean and cute! And is it just me, or would one of these be great for shoes...


*This is not a sponsored post. I just have the 'sweetest' friends!

May 29, 2014

Side-by-Side Challenge: Braids

Just a few days ago I shared about my personal challenge with braids. Today I am happy to share how a few other gals sport their braids in 2 Girls in 2 Cities Side-by-Side Challenge! If you like their style head on over to their blog listed below for more details.

Lisa - Sisters Marie
Julie - It's Julien
Kristyn - First Impressions

May 28, 2014

Travel Scarf

I'm happy to introduce a new item in my Etsy shop, a travel infinity scarf with a hidden pocket perfect for secretly storing a cell phone and passport! Quite stylish, no?! Get yours here and stay tuned for more colors and patterns.


May 27, 2014

Braid Challenge

I have had a bit more free time this late spring and early summer (SO GLAD THAT I FINALLY FINISHED THOSE DIAPERS!) so I decided to participate in another side-by-side challenge hosted by 2 Girls in 2 Cities. This month's challenge was braids, which was fitting since I find braids especially challenging. 

You're probably thinking "What? Braids? Challenging?" Here's the story ladies. My mama has naturally curly hair and doesn't know how to braid hair or how to teach me. I spent nearly every morning of elementary school sitting backward on the toilet set while my mother ripped the infamous topsy tail through my hair. #ouch #ninetieskid

In preparation for this challenge I tried many styles and even enlisted the help of a kind co-worker. In the end I decided on a simple and classic braid that even a beginner can handle, AKA me!


I started by back combing a few sections of hair at the crown of my head. Then I gathered my hair into a simply ponytail with an elastic band.


Next I braided a small section of hair from the bottom side of my ponytail, securing the ends with a small elastic.


Finally I wrapped the braid around the ponytail, covering the elastic, and used bobby pins to secure the braid. I really like how quick and easy this braid was, plus it was far less painful than a topsy tail!


If you liked this simple braid tutorial stop back by on Thursday to see what the other ladies were able to do!

May 18, 2014

SPRING CLEAN OUT SALE


Sew Help Me by Marissa, my Etsy shop, is having a HUGE SPRING CLEAN OUT SALE. Seriously people, all these accessories are priced to go. Head on over there to check out the sales now!

May 14, 2014

Natural Laundry

In the theme of my natural living transformation I revamped my laundry routine over the weekend. I made a super quick and easy laundry soap recipe which only took a few ingredients and was very inexpensive plus made a few dryer balls using my mother's technique posted earlier this week!

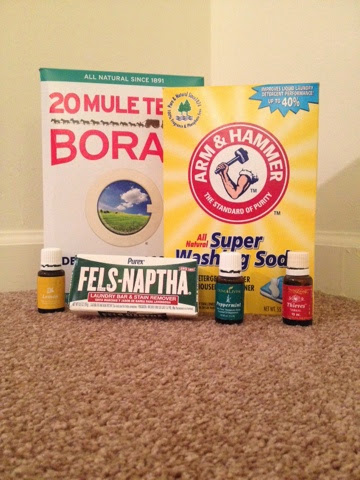
For the laundry soap recipe you will need:
  1. Fels-Napths
  2. Washing Soda
  3. Borax
  4. Water
  5. Essential Oils


Laundry Soap Recipe
Grate 1/4 bar Fels-Naptha soap into a sauce pan with 6 cups of water. Heat and stir until dissolved. Add 1/2 cup washing soda and 1/2 cup Borax. Stir until dissolved.


Add 4 cups hot water to large stock pot. Slowly add soap mixture and gently stir. Slowly add 1 gallon (16 cups) warm water. Divide into 4, 1/2 gallon containers and add 20-30 drops essential oil to each.

Suggested essential oils include: Thieves, Purification, Orange, Lemon, Lavender, and Peppermint. I tried the Thieves, Lemon and Peppermint. I'm really enjoying wrapping up in my Thieves towels after a relaxing shower!


I used a recycled laundry detergent container and a few other glass containers I had on hand because the recipe made SO MUCH more soap than I originally thought. You will want to make sure that you have multiple recycled laundry detergent containers on hand when you make this recipe, or you may want to half the recipe.

Afterward I made a few dryer balls using the technique my mother shared earlier in the week. I used a wool poly blend sweater and 100% wool yarn. It took a whole skein of yarn to make these two balls. 


I'm really enjoying my new laundry routine and think my husband is too, as soon as I can get him to remember to ditch the old fabric softeners!

May 12, 2014

DYER BALLS? REALLY?

Our family has always been looking for ways to eliminate chemicals from our lives. This goes back at least three generations. We now have more access to more chemicals than ever before. It is important to find places that you can get away from unneeded chemicals and look for reasonable alternatives. Our family was recently introduced to Norwex. They market a wool dryer ball that they suggest using instead of the perfumed dryer sheets. This really intrigued me. I did a little research and decided that I wanted to give dryer balls a try, so I got crafty making something similar to the Norwex product.

Gather your supplies.

I used a wool sweater that had accidentally been felted, and wool yarn that was left over from a different project. The yarn needs to be at least 80 percent wool, but 100 percent is best.
Cutting strips.

I started by cutting the sweater into thin strips. They were about 1/2 inch wide.
Making a ball.

When I had a few strips cut I wound them into a ball. I made the ball as tight as I could hold it. Then I sewed through the ball to hold it in place while I wound the yarn around it.
Winding the yarn.

After the ball was formed and stitched I wound the wool yarn around it. Use a good quantity of yarn. Make sure none of the sweater shows through. You are going to felt the wool yarn onto the wool ball that you have just made.  I made my dryer balls roughly the size of a tennis ball. When you have finished wrapping the yarn around the ball tuck the ends of the yarn inside the ball. You want to secure the ends well.
Ready for the felting.

Place your dry ball down into a leg of pantyhose or a knee high stocking. This will hold your yarn in place for the felting process. Throw that lumpy looking thing into the washing machine with a load of heavy clothes that you want to use hot water on. You can wash them separately but that is a little wasteful. Keep cycling the dryer balls through each load of laundry until they are adequately felted. It may take 3-5 cycles to get a good felting. You will know they are felted when you can sort of scrape your finger nail across the yarn without it separating easily. Agitation and heat are the combination that creates felting in wool items. Agitation is the greatest contributor.

After months of use.

I made three dryer balls, and you can see they are not exactly the same size. I have been using mine for months and I am happy with their usefulness. I add essential oils to the dryer balls to impart a light fragrance to my clothing. It is nicely subtle. During the winter months there is some static on some loads. I can deal with that if I know I am eliminating chemicals. You can see that the yarn has started to pill a little. This does not affect their usefulness and doesn't bother me. I think you should get crafty and make some dryer balls. It is a quick and effective way to eliminate some chemicals from your lives.