Showing posts with label upscale. Show all posts

July 7, 2014

Worth the Work

Porch sitting is one of the summer past times that I most enjoy. I rarely have time that I feel I can spend that way. I have found that if people join you in your porch sitting it is even more enjoyable. I decided I needed to acquire more seating for my porch so more people could join me. 

This is what I found on one of our treasure hunts one Saturday morning. I knew it would take some work, but the price was right. Hello my sweet lil' glider.

"New" glider

 This is an example of what I had to work with. Many spots the wood was bare and many of those spots had some mold too. I knew I needed to be cautious with the mold. Protective garments, eye and respiratory protection were a must.
Lots of weathered spots

 I found it easier to take a bucket of bleach to the mold before I finished dismantling the entire thing.

A little muscle power and a scrub brush is all it takes

Here is what the frame looked like when we had it mostly dismantled.
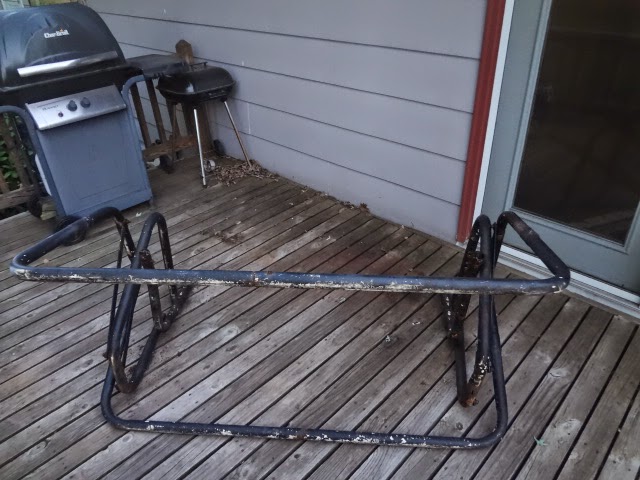
Lots of spots of surface rust

 The process involved  tearing the entire thing apart, sanding, scrubbing, sanding some more, priming, and then painting. It took a number of days to complete the process because I did one step each evening after I got home from work. When I got too tired I stopped working. It was worth the investment of time and energy. It is a welcome place to drink a cup of coffee in the morning and listen to the birds.


Here is the finished product. It has already weathered a couple of bad summer storms this year and came out wonderfully. Sometimes it is worth it to invest in some paint. I hope you too get a chance to sit and drink a cup of coffee and listen to the birds.

December 20, 2013

December Side-by-Side Challenge

Today I'm participating in another Side-by-Side challenge with the ladies from 2 Girls in 2 Cities! Earlier in the week you saw by Christmas party refashion and here I am at the party. (Notice the world's largest Christmas "tree" behind me!)

 
Check out these girls for other fun holiday outfit ideas!
 

December 17, 2013

Christmas Party Refashion

This fun royal blue silk number was sent to me by a family member for re-hab. It had a number of stains on the lower half of the skirt, but I LOVED the color and knew just what I wanted to do with it.
Before

and I loved this detailing along the waist!

The first step was to cut off the stains at the bottom of the dress. However, that length was a little awkward (not really a dress, not really a shirt...) so I cut it a few more inches. Then you could tell it was supposed to be a top. I had to be careful of the back zipper though, because the garment was originally a dress, the zipper is quite long.

Step number two, remove those 90s shoulder pads!


The third step was to hem the lining and outer layer, making sure to hem the lining higher than the outer layer so it wouldn't hang out. After a quick press I was really to go to my Christmas party!


November 10, 2013

Plaid Shirt Refashion

My mom had this men's large plaid shirt for a different craft, but I loved the material so much that i scooped it right up!

Oh course, it being a large was kind of a problem...


so I put the shirt on inside out and pinned away the excess on the sides and sleeves. Next I laid both sides on top of each other to make sure they were even. Then I cut away the excess and sewed up the side seams.


The next step in the process was shortening the sleeves. First I removed the cuff from the sleeve. Then I shortened the sleeve and finally re-attached it.


I love how the final product turned out! Now I have a cute plaid shirt dress for any bright autumn day.


August 27, 2013

My Polka Dot Refashion

I found this polka dot shirt during my recent trip to a Goodwill Outlet and loved the pattern. In fact, it reminded me of a shirt I already owned and loved. The great thing about the thrifted shirt is that it can easily be worn spring through fall.

My previously owned shirt next to my newly thrifted shirt.
But, it was also a bit too large. To tailor the shirt I put it on inside out and pinned the side and arm sleeves closer to my body. Then I averaged the length, sewed, and serged the side and arm seams.

So much pinning!


I really liked how the final product turned out. This outfit is a fun twist on this summer's black and white trend with a few bright pops of color and can easily transition into fall.


What transition pieces will you be wearing into fall?

July 16, 2013

Another Two-fer

 This story starts with a garage sale FREEBIE. The best price evah! We were ready to leave a garage sale when I spotted a free chandelier. I remembered having seen a Pintrest post about using the globes in your garden so I grabbed it up. My husband no longer asks questions. He just prepares to be amazed later on.


You can see it was a very 1970's type thing and just needed some love.


I removed the globes from the chandelier and inserted skinny solar lights. If you look really closely you can see that I needed to choose the next size smaller light. I really like the effect in the garden at night. It is so hard to get a good photo at night you will just have to trust me on that one. That process must have taken a minute or two. Seriously, you put the globe where you want it and insert solar light stake and attach solar light. Done.


Well of course that left the metal part of the frame and  no left overs can go to waste so.... I had to start turning the rest of it into something. Then my memory kicked in of another Pintrest post. I didn't repin those posts because I didn't think I would ever actually do them. Sorry I can't link back to those original ideas.

 I took all of the electrical fixtures and electric wires out of the lamp. Then I turned the whole thing upside down so that it set flat on a table.

I painted the entire piece silver. I chose the Hammered Silver paint because I thought it would help cover any of the little blemishes that the lamp's original paint might have. I was very pleased with the results. When the paint was dry I wiped some gel stain over it to give it an appearance of age. I added votive cups and candles and have a new center piece. I enjoy getting crafty with free items and using what I have on hand at home to create something new.


June 25, 2013

Side-by-Side Challenge: NEON


Today I am participating in a NEON side-by-side challenge with the lovely ladies above. Don't their ensembles inspire you?

This challenge inspired me to add a trendy neon piece to my wardrobe but I wasn't willing to spend a lot on it. I am currently investing in classic, staple pieces that will help me to build up my professional wardrobe so this re-fashion was the perfect option for an inexpensive summer piece. To see my before and after picture as well as the re-fashion process please visit my neon floral dress re-do post.


May 11, 2013

May 7, 2013

Dress Slacks Refashion

I love purchasing my dress slacks at thrift shops, especially because I can almost always find a great brand and great fit that usually only need a new hem. After about twenty minutes the slacks are a perfect fit. I got these H&M dress slacks with some of my Christmas money.

Slacks before
Perfectly colored tulips from my garden!
Slacks after
I gave these slacks a new hem line because I think the previous cuff made me look shorter. Do you like cuffs on dress slacks?

April 19, 2013

Floral Clutch Cover

Last summer I picked a few things up from the local free store. One of the things I picked up was a black velvet clutch that looked like it was in high fashion in the mid 80s. Thankfully it was still in great shape, and I had the perfect craft in mind for it, so I brought it home with me.

Any thoughts on what the craft may be? That's right, a clutch cover! And I had the perfect bright and springy fabric left over from my floral dress re-do last spring.

Pieces before.

First, I had to cut the remaining dress bodice open at the side seams and top straps then sew the two separate pieces together at the bottom to create enough fabric for the length of the clutch.

Plenty of material.

Next I had to begin engineering the piece, which took A LOT of measuring, pinning, and re-measuring. Both the bottom and sides of the original clutch were designed to expand and I knew that I wanted to be able to carry just as many things in my clutch once it was covered with this fun floral fabric.

Measuring and pinning.

Once I finally felt reassured that the measurements I had taken were correct I cut the material, sewed the top and bottom seam, and basted the side seams.

Mid-process.

The basting turned out really well so I sewed and serged the seams as well as sewing the bottom corners of the clutch to make a nice square, box shape for the clutch to expand.

Measuring out the bottom corners.

Once that was completed I was ready to iron my clutch cover and insert my clutch!

Ironed clutch cover.

Now my clutch cover is complete and I can take my newly updated black velvet clutch with me to a variety of spring events. And the magnetic closure still works through a few layers of material! I will continue to make additional covers for this clutch so that I can use it in all seasons, but may design the pattern a little bit differently next time as the back of the clutch cover doesn't fit as snugly as I would like.

Finished clutch cover.