Showing posts with label natural living. Show all posts

May 14, 2014

Natural Laundry

In the theme of my natural living transformation I revamped my laundry routine over the weekend. I made a super quick and easy laundry soap recipe which only took a few ingredients and was very inexpensive plus made a few dryer balls using my mother's technique posted earlier this week!

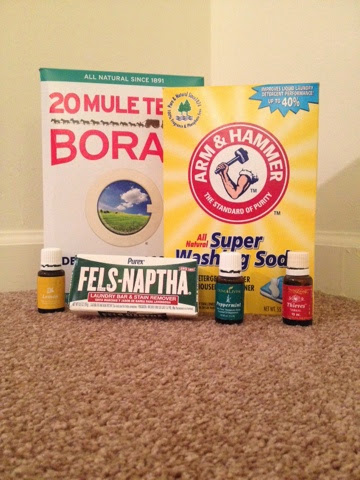
For the laundry soap recipe you will need:
  1. Fels-Napths
  2. Washing Soda
  3. Borax
  4. Water
  5. Essential Oils


Laundry Soap Recipe
Grate 1/4 bar Fels-Naptha soap into a sauce pan with 6 cups of water. Heat and stir until dissolved. Add 1/2 cup washing soda and 1/2 cup Borax. Stir until dissolved.


Add 4 cups hot water to large stock pot. Slowly add soap mixture and gently stir. Slowly add 1 gallon (16 cups) warm water. Divide into 4, 1/2 gallon containers and add 20-30 drops essential oil to each.

Suggested essential oils include: Thieves, Purification, Orange, Lemon, Lavender, and Peppermint. I tried the Thieves, Lemon and Peppermint. I'm really enjoying wrapping up in my Thieves towels after a relaxing shower!


I used a recycled laundry detergent container and a few other glass containers I had on hand because the recipe made SO MUCH more soap than I originally thought. You will want to make sure that you have multiple recycled laundry detergent containers on hand when you make this recipe, or you may want to half the recipe.

Afterward I made a few dryer balls using the technique my mother shared earlier in the week. I used a wool poly blend sweater and 100% wool yarn. It took a whole skein of yarn to make these two balls. 


I'm really enjoying my new laundry routine and think my husband is too, as soon as I can get him to remember to ditch the old fabric softeners!

May 12, 2014

DYER BALLS? REALLY?

Our family has always been looking for ways to eliminate chemicals from our lives. This goes back at least three generations. We now have more access to more chemicals than ever before. It is important to find places that you can get away from unneeded chemicals and look for reasonable alternatives. Our family was recently introduced to Norwex. They market a wool dryer ball that they suggest using instead of the perfumed dryer sheets. This really intrigued me. I did a little research and decided that I wanted to give dryer balls a try, so I got crafty making something similar to the Norwex product.

Gather your supplies.

I used a wool sweater that had accidentally been felted, and wool yarn that was left over from a different project. The yarn needs to be at least 80 percent wool, but 100 percent is best.
Cutting strips.

I started by cutting the sweater into thin strips. They were about 1/2 inch wide.
Making a ball.

When I had a few strips cut I wound them into a ball. I made the ball as tight as I could hold it. Then I sewed through the ball to hold it in place while I wound the yarn around it.
Winding the yarn.

After the ball was formed and stitched I wound the wool yarn around it. Use a good quantity of yarn. Make sure none of the sweater shows through. You are going to felt the wool yarn onto the wool ball that you have just made.  I made my dryer balls roughly the size of a tennis ball. When you have finished wrapping the yarn around the ball tuck the ends of the yarn inside the ball. You want to secure the ends well.
Ready for the felting.

Place your dry ball down into a leg of pantyhose or a knee high stocking. This will hold your yarn in place for the felting process. Throw that lumpy looking thing into the washing machine with a load of heavy clothes that you want to use hot water on. You can wash them separately but that is a little wasteful. Keep cycling the dryer balls through each load of laundry until they are adequately felted. It may take 3-5 cycles to get a good felting. You will know they are felted when you can sort of scrape your finger nail across the yarn without it separating easily. Agitation and heat are the combination that creates felting in wool items. Agitation is the greatest contributor.

After months of use.

I made three dryer balls, and you can see they are not exactly the same size. I have been using mine for months and I am happy with their usefulness. I add essential oils to the dryer balls to impart a light fragrance to my clothing. It is nicely subtle. During the winter months there is some static on some loads. I can deal with that if I know I am eliminating chemicals. You can see that the yarn has started to pill a little. This does not affect their usefulness and doesn't bother me. I think you should get crafty and make some dryer balls. It is a quick and effective way to eliminate some chemicals from your lives.

April 9, 2014

Etsy Shop Feature: EmmasNaturals


A dear friend recently gave me a set of EmmasNaturals for a gift and I LOVED them! The emollient bar, lotion stick, and lip moisturizer fit perfectly into my busy schedule and desire to live more naturally. My skin feels so nourished and my lips so moist after using these products, not to mention the yummy fragrances! (I have Caribbean Escape skin products and Creamy Coconut lip moisturizer.) The ingredient list is minimal and organic. I only wish that essential oils were used instead of fragrance/flavor oils. That being said, I would definitely order these for myself when I run out. You can purchase EmmasNaturals products on Etsy here!


*This is NOT a featured post. I just LOVE these product! Products featured with permission.

April 8, 2014

Natural Nails

As you all know, I have been trying out a more natural beauty regiment recently. Changing how I was eating, cleaning, and beautifying was generally easy since there are many products on the market to fill those voids. However, finding a "natural" nail polish was really putting a crimp in my side!

I was ecstatic when Krista introduced me to SpaRitual, a vegan beauty line, while Christmas shopping but just recently purchased a bottle for myself (which I found at TJ Maxx and Ulta.) It was very sheer and I had to apply 3 coats for full coverage, but did not use a base or top coat. It had a slight matte finish. I have been really impressed with how well it wears and would highly recommend you try it our as well!

Still no chips or wear after 3 full days of wear!

Color: Intellect

March 16, 2014

Natural Hair and Body Care

In this week's natural living class we covered hair and body care! To make your own shampoo, conditioner, body scrub, and bath salts you will need:

  1. Coconut Oil
  2. Castile Soap
  3. Olive Oil
  4. Essential Oils
  5. Water
  6. Guar Gum
  7. Epsom Salts
  8. Baking Soda
  9. Raw Sugar


Here are the recipes we used:

Shampoo
2 Tbsp. Coconut Oil
5 Tbsp. Castile Soap
1/4 - 1/2 tsp. Olive Oil (for dry hair)
10 drops Essential Oil

  • Lavender for oily hair
  • Cedar Wood for oily hair and to strengthen and thicken hair
  • Peppermint for dry hair
  • Lemon for oily hair and to strengthen hair
  • Mel A (Tea Tree) for oily hair and dandrif

I did not add olive oil, and I used 10 drops of Mel A.

This shampoo is very gentle, you should use about 1/2 tsp. at a time.
Shampoo should be refrigerated if you won't use it up in a week. Otherwise the coconut milk may go bad.

Conditioner
1/4 - 1/3 Cup of Water (use less water for dryer hair/thicker conditioner)
1/3 tsp. Olive Oil
1/2 tsp. Guar Gum
5-10 drops Essential Oil (same as shampoo)

I used Mel A again. I love it's smell!

Conditioner will expire when the oil expires, or the first expiration date of the ingredients.

Body Scrub
3 Tbsp. Coconut Oil - melt
3 Tbsp. Sugar (raw cane or brown sugar)
10 drops Essential Oil

  • Lemon to brighten, cleanse, and detox skin
  • Frankincense to detox skin
  • Lavender for eczema, sensitive, and dry skin
  • Orange and Mel A to tighten, firm, anti-aging, and fight cellulite
  • Mel A and Purification to fight acne
I chose Orange and Mel A and use it every other day in place of body wash.

Bath Salts
1/2 Cup Epsom Salts
1/4 Cup Baking Soda
10 drops Essential Oils (choose depending on your need)
  • Sick: Thieves and RC
  • Pain: Peppermint
  • Relax: Lavender & Frankincense
  • Detox: Lemon & Ginger
  • Anxiety: Lavender, Blue Spruce/Balsam Fur
  • Sore Muscles: Peppermint & Copaiba
  • Energy: Peppermint/Citrus
  • Sleep: Lavender & Cedar Wood
I used 5 drops of Lavender and 3 drops of Frankincense for relaxing. This will make enough for two bathes.


I really liked the bath salts and would definitely make that recipe again (even for gifts for friends!) I also liked the body scrub which left my skin feeling SO moist and rejuvenated. The shampoo left my hair feeling very clean and the conditioner was a great texture. However, my hair quickly felt and looked oily, so jury's still out on those.

March 5, 2014

Natural Body Care Products


In this week's natural living class we made chap stick, a lotion bar, and deodorant. So exciting! To make these body care products you will need:

  1. Coconut oil
  2. Shea butter
  3. Mango butter
  4. Beeswax (best to use pre-shredded)
  5. Vitamin E
  6. Arrow root starch
  7. Baking Soda
  8. Essential Oils
Here are the recipes we used:

Chapstick
1/2 tsp. beeswax
1 tsp. shea butter
1 tsp. mango butter
10 drops essential oils of your choice

Lotion Bar
1 Tbsp. coconut oil
1 Tbsp. shea butter
1 Tbsp. beeswax
1 capsule Vitamin E (400 IU)
20 drops essential oils of your choice

Deodorant
2 Tbsp. coconut oil
1 Tbsp. shea butter
1 Tbsp. mango butter
2 Tbsp. beeswax
1 capsule Vitamin E (400 IU)
2 Tbsp. arrow root starch
2 Tbsp. baking soda
30 drops essential oils of your choice


We started by melting the beeswax, shea butter, and mango butter for the chap stick in a double boiler on the stove. Once the ingredients were melted we added our essential oils and poured the chap stick into containers. I wear contacts and have TONS of extra contact cases so I re-purposed some into chap stick holders. For this recipe I used 5 drops of lavender and 5 drops of orange, both are great for your skin.

Please note that it is important to not let your essential oils get too hot or they may start to loose some of their healing properties. You should add the oil once you have taken the jar out of the double boiler.


Next we made lotion bars melting the coconut oil, shea butter, and beeswax in the double boiler. Once those ingredients were melted we added Vitamin E and essential oils. I used 10 drops of pan away and 10 drops of peppermint to make a "pain relief bar."

The deodorant was very similar. We melted the coconut oil, shea butter, mango butter, and beeswax in the double boiler. Then we added the Vitamin E, arrow root starch, baking soda, and essential oils. I used 10 drops of Mel A (tea tree oil), 10 drops of lemon, and 10 drops of peppermint. This combination will be antiseptic, bactericide, anti-fungal, and refreshing.

We poured both the lotion bars and deodorant into muffin wrappers but a recycled deodorant stick would also work very well.

If you are planning to use the same melting jar for each recipe it is important to save the deodorant for last. You don't want any left over baking soda (a salt) drying up your lips or skin!


I have really liked all of these products and would definitely make them again. The deodorant is AMAZING and I think I will quickly be making a permanent home for it in my bathroom cabinet.

For last week's natural living class on makeup click here.

February 23, 2014

Natural Makeup

Yesterday one of my girlfriends hosted the first of multiple natural living classes. The theme was MAKEUP, so naturally I was the first one there!

Using a few basic ingredients and recycled baby food jars we made a face scrub, moisturizer, powder foundation, powder bronzer, and a cream eye shadow.


If you'd like to join me in a more natural makeup routine you will need:
  1. Arrow root starch
  2. Cocoa
  3. Cinnamon
  4. Ginger
  5. Paprika
  6. Coconut oil
  7. Baking soda
  8. Lemon juice
  9. Honey
  10. Vitamin E
  11. Essential oil(s) of your choice
Here are the recipes we used:

Exfoliating Face Scrub
2 tsp. baking soda
1 tsp. lemon juice
4 Tbsp. honey

Moisturizer (Combo/Oily Skin)
4 Tbsp. coconut oil
1 capsule Vitamin E (400 IU)
10 drops essential oil (I used orange)
Heat 10 seconds in microwave to stir, let firm

Powder Foundation
1 Tbsp. arrow root starch
spices to color (I used 1/2 tsp. cocoa, 1/2 tsp. cinnamon, 1/8 tsp. ginger, and a smidgen of paprika)

Powder Bronzer
1/2 tsp. arrow root starch
1/2 tsp. cocoa
1/2 tsp. cinnamon

Cream Eye Shadow
1/4 tsp. coconut oil
Bronzer powder to color
(3 parts powder to 1 part oil)


I really like the face scrub and moisturizer and plan to continue using them. The powder foundation and bronzer looked nice and went on well but weren't long lasting. The cream eye shadow was difficult to apply and immediately migrated to the creases in my eyelids, I probably won't use it again.

Do you use natural makeup? Feel free to share your favorite recipes and brands!

June 23, 2013

Pinterest Buster: Shower Head Cleaner

Have you ever gotten in your shower only to have difficulty getting wet? Well that was my problem and I was at my wit's end until I found a great pin from A Real-Life Housewife with just the fix!

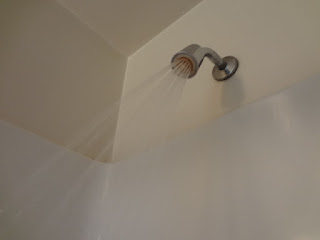
Shower stream before.
Supplies needed.
 All I needed was vinegar, a baggy, and a rubberband. I filled the baggy with about 3/4 cup of vinegar and rubberbanded it over the shower head making sure the shower head was completely submerged in vinegar.


I left the shower head submerged in the vinegar for eight hours and was AMAZED at the amount of rust and calcium that had fallen to the bottom of the bag.


Now I have a wonderful stream and my shower head is sparkling clean! One thing I have been learning from Pinterest cleaning pins is that I should always have vinegar on hand when I'm cleaning. I have also used it to clean my microwave and Krista used it in a weed killer.

May 5, 2013

Pinterest Busters: Microwave Cleaner

Honestly, my microwave isn't usually this dirty. I swear! But I do LOVE baked beans and I had a little incident recently when I tried to re-heat some in the microwave.


I didn't even take any "artistic license" here. The bean on the counter top actually jumped out of the microwave because it was so dirty.


Thankfully I spend a fair, ahem, amount of time on Pinterest and remembered a "How To Clean Your Microwave" pin that I had on my cleaning board. I quickly followed the directions, microwaving a water and vinegar solution for five minutes and then wiping down the microwave. I had to microwaved the solution for twice as long as the directions called for and still needed a fair amount of elbow grease. However I was happy with the outcome and glad to have used a safe cleaner for my microwave. I eat things out of there!


Pinterest Busters: Winner

August 12, 2012

Pinterest Busters- Natural Weed Killer

We often pin, but how often do we really get the gumption to try out these things?

Oh trust me, I got the gumption. There is nothing I hate more than weeds in a drive way. I swear it makes a house look dumpy in an instant, and our house has no shortage of driveway weeds. SO, I took the plunge and tried this natural weed killer I found on Pinterest.

As per usual I didn't have the right ingredient so I went with what we had. I ended up using..
  • All the salt I could find in the house, which wasn't quite 1/2 a cup
  • Apple Vinegar instead of Pickling Vinegar
  • "A squeeze of dish soap." I had no idea what that meant so I was very generous. 
Here were my results.


Pinterest Busters Final Say: GOOD STUFF!!