Today marks the second anniversary of our first blog post! It's hard to believe that we have been blogging for two whole years. To celebrate I decided to make a special treat to share with Mom and Krista over the holiday weekend, two ingredient pumpkin muffins. This is honestly the EASIEST recipe I have in my recipe box and I pull it out for any number of occasion that I'm asked to bring food to.
All you need to make these muffins is one 15.25 oz. box of cake mix (I like classic yellow because of its buttery flavor, but carrot and chocolate are nice too) and one 15 oz. can of pumpkin puree (or the same amount of old bananas or apple sauce.)
Mix the two ingredients together and place equal amounts in a 12 hole muffin tin.
After baking the recommended amount of time on the back of the box, about 20 minutes, the muffins are finished! What is your favorite easy recipe?
November 26, 2013
November 24, 2013
Pallet Wall Sconce
My friend Stephanie recently decided to make pallet wall sconces to match her pallet wall art and it was SUPER EASY! Plus her husband has access to pallets at work (jealous!)
She began by flipping the pallet over and measuring 16.5" up on what used to be the front of the pallet and will be the back of the sconce. Then she measured up 5.5" on what will be the front of the sconce.
Once Stephanie had made all the measurements her husband cut the pallets. Wa-la, the are pre-assembled, no nailing! Then she used the same process to paint the sconces as she had the wall art. I love how they turned out!
November 23, 2013
Bias Tape Baby Bib
This was the most quick and easy baby project ever! I started with a piece of quilted material, cut in the shape of a bib, and bias tape. When using bias tape you will notice that one side is slightly longer than the other, this side should always be on the bottom of your project.
First, I cut a piece of bias tape for the center of the bib.
My mom's tip for bias tape is to pin it to the back side of the project and baste it on first, sewing inside the first fold.
Once the bias tape was sewn onto the back I pinned the rest to the front side and top stitched leaving a finished edge.
I followed the same steps for the outer edge, leaving tails to use as ties.
Ta-Da, the project was very inexpensive and done in minutes!
November 16, 2013
Holidazzle
Today my Mom and I went to the biggest and best craft show in town and came home with a TON of ideas.
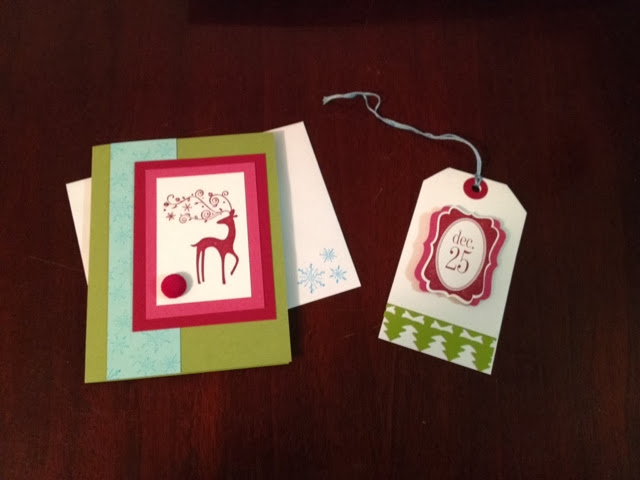
To kick off our holiday crafting we made a set of Christmas cards and gift tags inspired by Creative Memories Holidazzle Gift Wrap.
The cards were made with Stampin' Up paper colors, Lucky Limeade, Cherry Cobbler, Rose Red, Pool Party, and Whisper White, Stampin' Up stamps Dasher and Tags 'til Christmas, and Stampin' Up punches.
November 11, 2013
November 10, 2013
Plaid Shirt Refashion
My mom had this men's large plaid shirt for a different craft, but I loved the material so much that i scooped it right up!
Oh course, it being a large was kind of a problem...
so I put the shirt on inside out and pinned away the excess on the sides and sleeves. Next I laid both sides on top of each other to make sure they were even. Then I cut away the excess and sewed up the side seams.
The next step in the process was shortening the sleeves. First I removed the cuff from the sleeve. Then I shortened the sleeve and finally re-attached it.
I love how the final product turned out! Now I have a cute plaid shirt dress for any bright autumn day.
November 5, 2013
Cream Knit Infinity Scarf
Today I saw a woman walking down the sidewalk wearing a white knit infinity scarf with a chambray shirt, bright red pants and cardigan, and brown boots. I LOVED it and immediately began to think about how I could replicate that outfit with what I already owned. Sadly I came up short in the scarf department, until I remembered that I had started knitting a cream scarf a long time ago, ran out of yarn, and forgotten about the project.
 |
| How I found my discarded scarf. |
 |
| After binding off. |
 |
| Sewing ends together. |
 |
| Finished product! |
Subscribe to:
Comments (Atom)


