Showing posts with label refinishing. Show all posts

July 7, 2014

Worth the Work

Porch sitting is one of the summer past times that I most enjoy. I rarely have time that I feel I can spend that way. I have found that if people join you in your porch sitting it is even more enjoyable. I decided I needed to acquire more seating for my porch so more people could join me. 

This is what I found on one of our treasure hunts one Saturday morning. I knew it would take some work, but the price was right. Hello my sweet lil' glider.

"New" glider

 This is an example of what I had to work with. Many spots the wood was bare and many of those spots had some mold too. I knew I needed to be cautious with the mold. Protective garments, eye and respiratory protection were a must.
Lots of weathered spots

 I found it easier to take a bucket of bleach to the mold before I finished dismantling the entire thing.

A little muscle power and a scrub brush is all it takes

Here is what the frame looked like when we had it mostly dismantled.
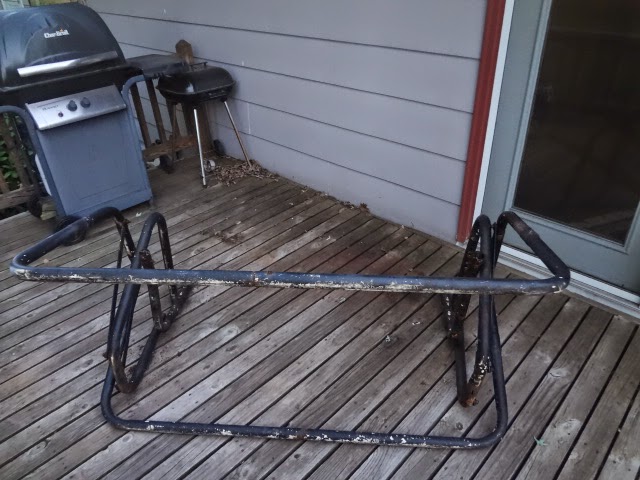
Lots of spots of surface rust

 The process involved  tearing the entire thing apart, sanding, scrubbing, sanding some more, priming, and then painting. It took a number of days to complete the process because I did one step each evening after I got home from work. When I got too tired I stopped working. It was worth the investment of time and energy. It is a welcome place to drink a cup of coffee in the morning and listen to the birds.


Here is the finished product. It has already weathered a couple of bad summer storms this year and came out wonderfully. Sometimes it is worth it to invest in some paint. I hope you too get a chance to sit and drink a cup of coffee and listen to the birds.

August 30, 2013

Kitchen Chairs

I bought this dining room table and four chairs at a garage sale the summer before we got married, FOR ONLY $40! 

Before you go thinking I'm amazing, let me just tell you how bad the seats of the chairs looked. They were stained, 90's colors, and smelled horrible. They were bad. I wish I had a picture to show you truly how bad they were. But you'll just have to trust me on this one.

Luckily this "refinishing" project was quick and inexpensive. First I unscrewed the seats from the frames of the chairs. Next I measured the seats and cut four squares of upholstery material, leaving a few inches of excess. Then I stapled squares of upholstery material at the bottom of the seats and screwed them back on. The whole project took about 30 minutes. Material was purchased with a coupon from JoAnn.

Dining Room Set

Completed Chair

July 16, 2013

Another Two-fer

 This story starts with a garage sale FREEBIE. The best price evah! We were ready to leave a garage sale when I spotted a free chandelier. I remembered having seen a Pintrest post about using the globes in your garden so I grabbed it up. My husband no longer asks questions. He just prepares to be amazed later on.


You can see it was a very 1970's type thing and just needed some love.


I removed the globes from the chandelier and inserted skinny solar lights. If you look really closely you can see that I needed to choose the next size smaller light. I really like the effect in the garden at night. It is so hard to get a good photo at night you will just have to trust me on that one. That process must have taken a minute or two. Seriously, you put the globe where you want it and insert solar light stake and attach solar light. Done.


Well of course that left the metal part of the frame and  no left overs can go to waste so.... I had to start turning the rest of it into something. Then my memory kicked in of another Pintrest post. I didn't repin those posts because I didn't think I would ever actually do them. Sorry I can't link back to those original ideas.

 I took all of the electrical fixtures and electric wires out of the lamp. Then I turned the whole thing upside down so that it set flat on a table.

I painted the entire piece silver. I chose the Hammered Silver paint because I thought it would help cover any of the little blemishes that the lamp's original paint might have. I was very pleased with the results. When the paint was dry I wiped some gel stain over it to give it an appearance of age. I added votive cups and candles and have a new center piece. I enjoy getting crafty with free items and using what I have on hand at home to create something new.


September 2, 2012

Wooden Shelf Re-Do

We rent an old farm house. And I mean OLD! So old in fact that we do not have central air conditioning and the electrical wires can't handle even a window unit. Needless to say, we got wise to the heat and moved our mattress down to the first floor for the summer. Since summer is nearly over I decided to move our mattress back upstairs. I feel like an adult again!

My Sad Headboard Without a Mattress or Shelf
Over the summer I found this neat wooden shelf at a garage sale and thought it would be the perfect fit for my bedroom if I painted it. All I needed for this project was a shelf, fine sandpaper, a clean cloth, and spray paint for wood.

Before: Shelf

Step 1: Lightly Sand Shelf

Step 2: Wipe Dust from Shelf

Step 3: Spray Shelf Evenly

Step 4: Once Dry, Hang Shelf

Step 5: Decorate as Desired
I love how it turned out but we had a lot of difficulty hanging it. Do you have any good hanging tips?

June 24, 2012

Sale-ing

Small Plant Stand

Sailing takes me away to where I've always heard it could be
Just a dream and the wind to carry me
And soon I will be free
Ok you are supposed to be hearing that in Christopher Cross voice to the song from the seventies.

My version:
Sale-ing takes me away where I've always heard it could be
the dream that I have wanted it to be
And soon it will be free.

Well these weren't quite free, almose though.

That sweet little plant stand was TWO DOLLARS!!! at a local garage sale that I happened upon. I couldn't find anything wrong with it, and it clearly needed me, so a new relationship was started.  Now I have to wait to see what it will become.....


Unique Collection
Now this group was quite a special gathering. I usually make only lye soap, so I never think about the melt and pour glycerine soap. When I found this nearly full box of soap and this soap mold together I thought that I was clearly supposed to have them. The bay leaves are already on my mind for a future project and post that I am currently working on. That stamp set was really calling to me because I have recently been to a stamp camp that had some super nice cards that I would like to re-create. So many things that I want to "get crafty" with.  Sale-ing..

April 22, 2012

Stripping For Fun: My Refinishing Project!

I love to find a great piece of inexpensive furniture that I know has potential. With a little effort and even less money you can have both classic and statement pieces before you know it.

I found this cute little side table at a garage sale last year for only $5. So far I have only invested $10 for paint stripper, $1 for a few sheets of sand paper and a few hours of time.

What you'll need for stripping:
  • Paint stripper (I like Strip-ease or Zip Strip)
  • Sand paper
  • Steal wool
  • Old paint brush (To apply the paint stripper)
  • Rags
I began my project by disassembling the piece. Then I applied the paint stripper as directed and wiped the paint away. As you can see I will need to hit a few of the difficult spots a second time. After that I will lightly sand each piece and they will be ready for stain and a finish. The weather was so beautiful after work this week that I got excited and began stripping the paint off before I remembered to take a before picture!

Stay tuned for the next step.

Table top with stripper.
Paint on table top and middle bubbling.
Paint wiped away with one swipe!
Table top and middle without paint.
Table layout.