Showing posts with label for the home. Show all posts

July 31, 2014

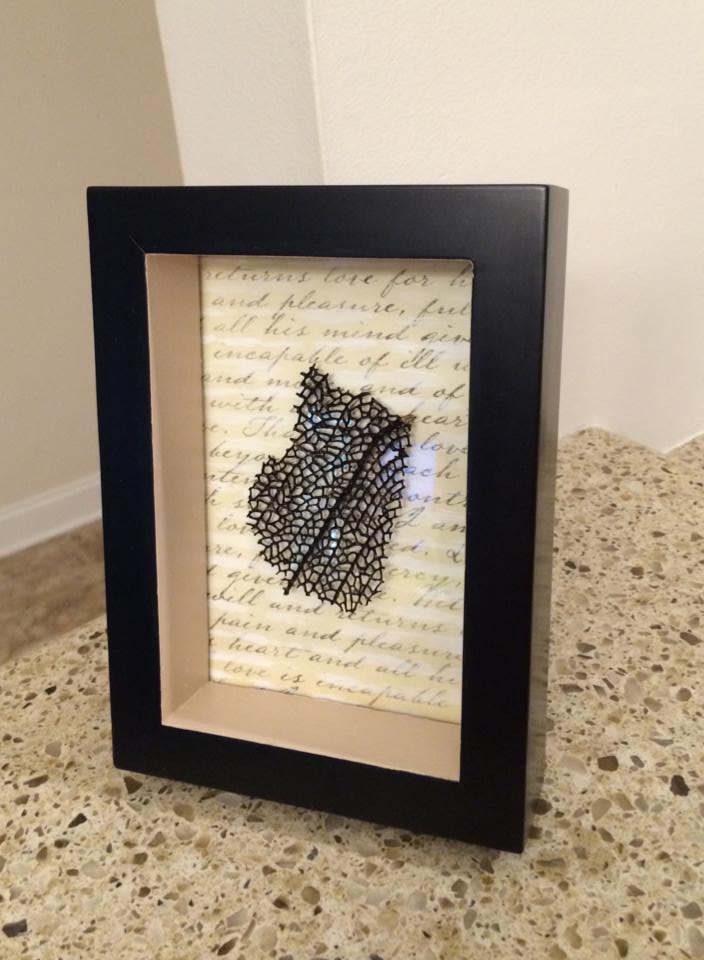
Sea Fan Wall Art

Today's post is written by my guest blogger and very artistic cousin-in-law Heather. After I saw how BEAUTIFUL her sea fan wall art turned out I knew I needed to share her tips and tricks with all of you. If we're being honest with ourselves, don't we all have a baggie of found sea things that we should be displaying? I know I do!


Heather's Sea Fan

Other materials needed


Materials needed:
Seashell or sea fan for center piece
Picture Frame (I chose a raised/shadow box picture frame)
Scrap book paper of choice
Acrylic paint (optional)
Paint brushes/foam brushes
Heavy craft glue

1. Paint a thin layer of mod podge on top of the sea fan to let it dry. If you are working with a fragile sea shell, you can do the same to strengthen it.
2. Select picture frame. Paint it to color (if needed) and let dry.
3. Cut out a piece of scrap book paper to fit inside frame/become the back ground for the shell. You can paint highlights/accents on to the scrap book paper if desired.
4. Once all pieces are dry (sea fan/shell, picture frame and scrapbook paper) assemble the frame with the scrap book paper in place of the picture.  
5. Glue the sea fan to your frame/glass. The frame I chose is a drop shadow frame, however has the glass flush against the backing. Because of this, I decided to glue the sea fan on top of the glass, centered. If your glass is raised to the top of the frame (leaving space inside the frame/box for a shell) you will need to take an extra step of gluing the scrap book paper to the backing. To do this, you’d want to paint a thin coat of the glue to the back of the scrap book paper and adhere to the backing of the frame so the scrap book paper is strong enough to hold up the shell. Once done, then you’d glue the shell to the scrap book paper).
6. Let your pieces dry and enjoy!

Her finished product!

July 7, 2014

Worth the Work

Porch sitting is one of the summer past times that I most enjoy. I rarely have time that I feel I can spend that way. I have found that if people join you in your porch sitting it is even more enjoyable. I decided I needed to acquire more seating for my porch so more people could join me. 

This is what I found on one of our treasure hunts one Saturday morning. I knew it would take some work, but the price was right. Hello my sweet lil' glider.

"New" glider

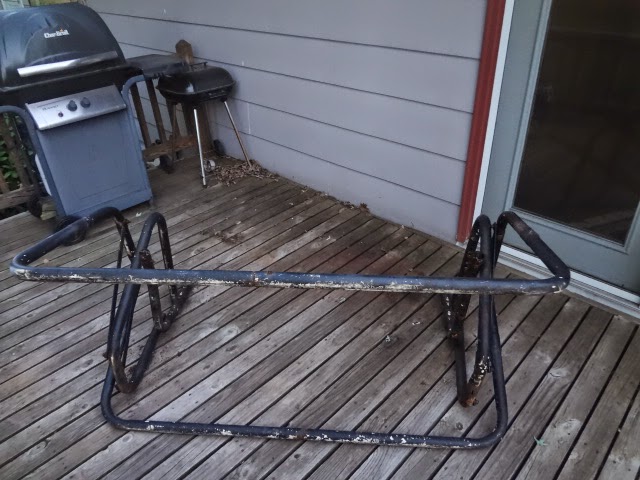
 This is an example of what I had to work with. Many spots the wood was bare and many of those spots had some mold too. I knew I needed to be cautious with the mold. Protective garments, eye and respiratory protection were a must.
Lots of weathered spots

 I found it easier to take a bucket of bleach to the mold before I finished dismantling the entire thing.

A little muscle power and a scrub brush is all it takes

Here is what the frame looked like when we had it mostly dismantled.
Lots of spots of surface rust

 The process involved  tearing the entire thing apart, sanding, scrubbing, sanding some more, priming, and then painting. It took a number of days to complete the process because I did one step each evening after I got home from work. When I got too tired I stopped working. It was worth the investment of time and energy. It is a welcome place to drink a cup of coffee in the morning and listen to the birds.


Here is the finished product. It has already weathered a couple of bad summer storms this year and came out wonderfully. Sometimes it is worth it to invest in some paint. I hope you too get a chance to sit and drink a cup of coffee and listen to the birds.

May 12, 2014

DYER BALLS? REALLY?

Our family has always been looking for ways to eliminate chemicals from our lives. This goes back at least three generations. We now have more access to more chemicals than ever before. It is important to find places that you can get away from unneeded chemicals and look for reasonable alternatives. Our family was recently introduced to Norwex. They market a wool dryer ball that they suggest using instead of the perfumed dryer sheets. This really intrigued me. I did a little research and decided that I wanted to give dryer balls a try, so I got crafty making something similar to the Norwex product.

Gather your supplies.

I used a wool sweater that had accidentally been felted, and wool yarn that was left over from a different project. The yarn needs to be at least 80 percent wool, but 100 percent is best.
Cutting strips.

I started by cutting the sweater into thin strips. They were about 1/2 inch wide.
Making a ball.

When I had a few strips cut I wound them into a ball. I made the ball as tight as I could hold it. Then I sewed through the ball to hold it in place while I wound the yarn around it.
Winding the yarn.

After the ball was formed and stitched I wound the wool yarn around it. Use a good quantity of yarn. Make sure none of the sweater shows through. You are going to felt the wool yarn onto the wool ball that you have just made.  I made my dryer balls roughly the size of a tennis ball. When you have finished wrapping the yarn around the ball tuck the ends of the yarn inside the ball. You want to secure the ends well.
Ready for the felting.

Place your dry ball down into a leg of pantyhose or a knee high stocking. This will hold your yarn in place for the felting process. Throw that lumpy looking thing into the washing machine with a load of heavy clothes that you want to use hot water on. You can wash them separately but that is a little wasteful. Keep cycling the dryer balls through each load of laundry until they are adequately felted. It may take 3-5 cycles to get a good felting. You will know they are felted when you can sort of scrape your finger nail across the yarn without it separating easily. Agitation and heat are the combination that creates felting in wool items. Agitation is the greatest contributor.

After months of use.

I made three dryer balls, and you can see they are not exactly the same size. I have been using mine for months and I am happy with their usefulness. I add essential oils to the dryer balls to impart a light fragrance to my clothing. It is nicely subtle. During the winter months there is some static on some loads. I can deal with that if I know I am eliminating chemicals. You can see that the yarn has started to pill a little. This does not affect their usefulness and doesn't bother me. I think you should get crafty and make some dryer balls. It is a quick and effective way to eliminate some chemicals from your lives.

January 27, 2014

BLIZZARD BUSTER

Recently I was talking to my brother when he mentioned how hard it has been for his grand kids to be cooped up in the house. Their mom is running out of ideas to keep them engaged in wholesome activities. That was when I remembered how much I loved sewing cards as a child. I had some fancy cards from the store and I really felt special every time I got them out to use them. When they got a little worn my crafty grandma set to work to make a home crafted version for me. So here is my rendition of that memory.
Cut 12 x 12 cardboard into quarters.
I started with a 12 x 12 piece of white cardboard. You can use anything you have on hand. If you are desperate you could even use a breakfast cereal box. Get creative and use what you have on hand. I decided that because this was a craft for young people the sewing cards shouldn't be too big. It seemed natural to divide the cardboard into quarters. That made each card a 6 x 6 square.

Start your art work.
 Now is the fun creative/crafty part. You need an image on each card for the kids to sew around. You may use a stencil, a photo from a magazine, trace a picture from a coloring book, or in my case sketch something because it was faster than finding the coloring books in our house. The design needs to be fairly simple and have a strong outline. I sketched a lady bug, goldfish, bird and tulip. Then I added color to the picture. As soon as you have your picture colored you will want to add the holes that the sewing will go through. They should be evenly spaced and place them near the edge of the outline. You can see that I used a hole punch for some of the areas and a islet hole punch for the inner areas that I couldn't reach with the regular hole punch.
Add the well placed holes.
 Next choose your "thread". It can be anything that you have on hand. It might be yarn (mine was) or string or a shoe lace, embroidery floss, or ribbon. Just use what ever you have. I used some Scotch tape to create a stiff end to the yarn. If you use a shoe lace this step is already completed. If you have a child that is old enough to use a plastic darning needle you won't need to do this step. You be the judge of what would be safe for your special kiddo. I found that if you wrap a piece of tape around the yarn before you cut the yarn into two pieces it seems to work more easily.
Create the "thread".

Close up of the thread end.
 Once you get the end of the yarn stiff enough to sew with you just start anywhere that works for you. My grandma never made me start anywhere special. She usually told me not to knot the end. (Smart grandma). This is not only a good way for the kids to do something quiet, but it really helps to develop eye/hand coordination and a sense of order. Each kid will inevitably end up with some giant knots. Let them try to undo what they did. Let them struggle a little with cause and effect before you rescue them from the dreaded knot.
Finished sewing card.
Here is what the finished sewing card looks like. This is a good old fashioned quiet educational item. Think about trips in the car, church services, or any other time little hands need to busy with an indoor activity. It really is a good "blizzard buster".

January 1, 2014

Simple Bed Makeover

A while back Krista started to makeover our childhood bedroom. She painted the walls and as much trim as she was allowed and Mom made new window treatments and purchased new bedding. But the room wasn't quite complete.

While I was home for Christmas break I made a few pillows to tie the whole look together. Its amazing how a few simple pillows can make all the difference in a bedroom!

Small Pillows

I wanted to take the easy way out and top stitch the pillow closed, don't tell my 4-H leader, so I decided to also top stitch the bottom end of the pillow for a uniform look.

Bottom of pillow


Once the small pillows were stuffed and sewn together (no small feat) I started on the larger pillows.


I really like the completed look and best of all it was very quick and inexpensive! Now all we need to do is paint the bedframes white.

December 8, 2013

Christmas Wreath

Over the Thanksgiving holiday my mom and I made a Christmas wreath out of an evergreen base, poinsettias, and gold swirlies that she had found at garage sales. We thought the poinsettias looked a little plain so we decided to spruce them up with faux snow and glitter!


(We used mod podge to make the glitter stick.) After the "snow" had dried I added the gold swirls in randomly and added a green bow to the bottom of the wreath.


I made the bow by looping ribbon together and fastening the loops with a bread tie. And I used the bread tie to fasten the bow to the wreath. So simple!


A festive Christmas wreath brought to you by my mama's thriftiness and good company!

November 24, 2013

Pallet Wall Sconce

My friend Stephanie recently decided to make pallet wall sconces to match her pallet wall art and it was SUPER EASY! Plus her husband has access to pallets at work (jealous!)

She began by flipping the pallet over and measuring 16.5" up on what used to be the front of the pallet and will be the back of the sconce. Then she measured up 5.5" on what will be the front of the sconce.


Once Stephanie had made all the measurements her husband cut the pallets. Wa-la, the are pre-assembled, no nailing! Then she used the same process to paint the sconces as she had the wall art. I love how they turned out!


October 18, 2013

Magnetic Covered Buttons


I was thrilled when I recently found this piece of material in the salvage section at JoAnn!


I made this scarf with the material I found. Love it? It's listed in my Etsy shop!


I love the material too, so I decided to use the scraps to make covered button magnets! I have made covered buttons before and was familiar with the process, but it is very simple and the packaging includes instructions if this is something you would like to try.


First I traced around the guide (included in the package), making flower or leaf patterns center when possible, and cut out the circular shapes.


Next I placed the material face down in the mold (also included in the package), put the button shell on top, and pushed both down into the mold.


Then, I pushed the excess material down into the cavern and cover with the button back. I chose the back without a button shank (the package I purchased had both options) because I would soon be gluing a magnet to the back.


Finally I used the blue pusher tool (included in the package), to firmly push the back down into the shell of the button, with the excess material sandwiched in between.


Ta-Da, buttons covered! The last thing I needed to do to complete my covered button magnets was glue circular magnets on the back.


Be careful not to use too much glue. I used Elmer's Glue-All Max and found that some had bubbled over the following day.


I used my magnets on a framed piece of metal above my desk (another craft for another day!) I love showcasing some of my favorite things here!