January 2, 2012

Apple App Review

Hello Blog Readers,

Krista here. My sister, Marissa, found this amazing app! I just had to blog about it and let you all know! Its called "Go Try It On" Here is what the app looks like when you search for it.

Go Try It On Logo
Basic Idea: The idea of this app is to critique others outfits and have your outfits critiqued as well. You can upload pictures and other users will give you advice such as suggesting a different belt or shoe choice. I personally love it because it allows me to see what other REAL women look like, and think about my outfit. I'm SO over magazines that are only made for 6 foot 100 pound women.


Main Screen

Main Screen: When you first open the app it had four main options to click on; upload, to-do's, featured stylists, and browse. Obviously "upload" is where you can post your own photos. To-Do's is the area where people who have chosen you as one of their stylists can ask you to take a look at their specific outfit. You can either click "wear it," "change it," or leave a comment.

Other Great Features:
  • When uploading a picture there is a blur tool that can be used to blur your face. This helps ensure privacy.
  • When you find another user with a style similar to yours you can ask them to be our stylist.
  • This app can connect to Facebook if you please!

January 1, 2012

Paul's Present

Paul and I are on a Christmas budget this year, so I decided to bulk up his Christmas gift by making him a pair of fleece pajama pants. (I got the hint that this would be a good gift when he started wearing mine around the house, even though they were too short!)

My pajama pants

I used my pajama pants as a pattern, since I already knew that they were wide enough around, and added about 5-6" to the bottom. First I folded my pants so I could lay and cut out each corresponding panel, at my mother's suggest. Since she wasn't with me in person she recommended this website for help with the panel concept.


Cutting the pajama fronts.

The fabric is folded in half, so I cut both right and left front panels at one time, as seen above. This panel piece should NOT be on the fold and DON'T FORGET to add extra length if necessary.

Cutting right and left back panels.
Front and back panels, cut.
Once I had all four pieces cut out I sewed the right front and back panels together at the inner seam, right sides together, and the left front and back panels together at the inner seams, right sides together. Then, with right sides together, I sewed the right and left legs together at the inseam. Next I sewed the outer seams closed. About 2 1/2 inches down from the front inseam I made a small button hole on each side of the seam with my sewing machine. To finish the project I made a one inch casing around the top of the pants and used the button holes to thread the draw string through and hemmed the pants.
Me and Paul in our pj's!

December 14, 2011

Plaid Skirt: Wardrobe Update

I recently decided to spice up my wardrobe with a new skirt to wear to some of my up coming fall and winter events. I used one of my mother's old patterns because older patterns seem to fit me better and the style was classic.

My mother's pattern.
I used a woven plaid print for the skirt; it was my first time sewing with a plaid. My Aunt Karen, Helen's oldest daughter, taught me to aline the plaids before cutting out the pattern pieces by sticking a pin through the middle of the plaid.

Pin at cross section of plaid.
Then she flipped over the material and make sure the pin exited at the same location of the plaid as it entered.

Pin through cross section of both layers.
Adjust accordingly and pin material in place before cutting out your pattern.


Secure both layers once aligned.

Finished product!

December 10, 2011

Christmas Stockings

My next project is Christmas stockings to match my new Christmas tree skirt. I started by tracing an old stocking. You can do the same thing, just remember to add 5/8" for a seam allowance.

Stocking cut out.
I chose a busy print, so I wanted to add cuffs to embroder our names on. If you also choose to add a functional cuff you will want to make sure that it is slightly wider than the stocking itself and that the material is doubled over.

Stockings with cuffs.

Before sewing embroder the cuffs as desired. I embrodered our names on the cuffs in red and green.

Embroidering the cuffs.

Once I finished embrodering the cuffs I sewed them at the side seams, right sides together. I also sewed the stocking panels, right sides together, and turned them right side out. Then I pressed both the cuff and stocking seams. Next I ironed 1/4" of the raw edge (top) of the cuff to the back and 1/4" of the raw edge (top) of the stocking to the front. With the cuff on top of the stocking top stich 1/8" from the top. DON'T FORGET TO ADD A HANGER!

Sewing cuffs to stockings.

December 3, 2011

Goodwill Rehab


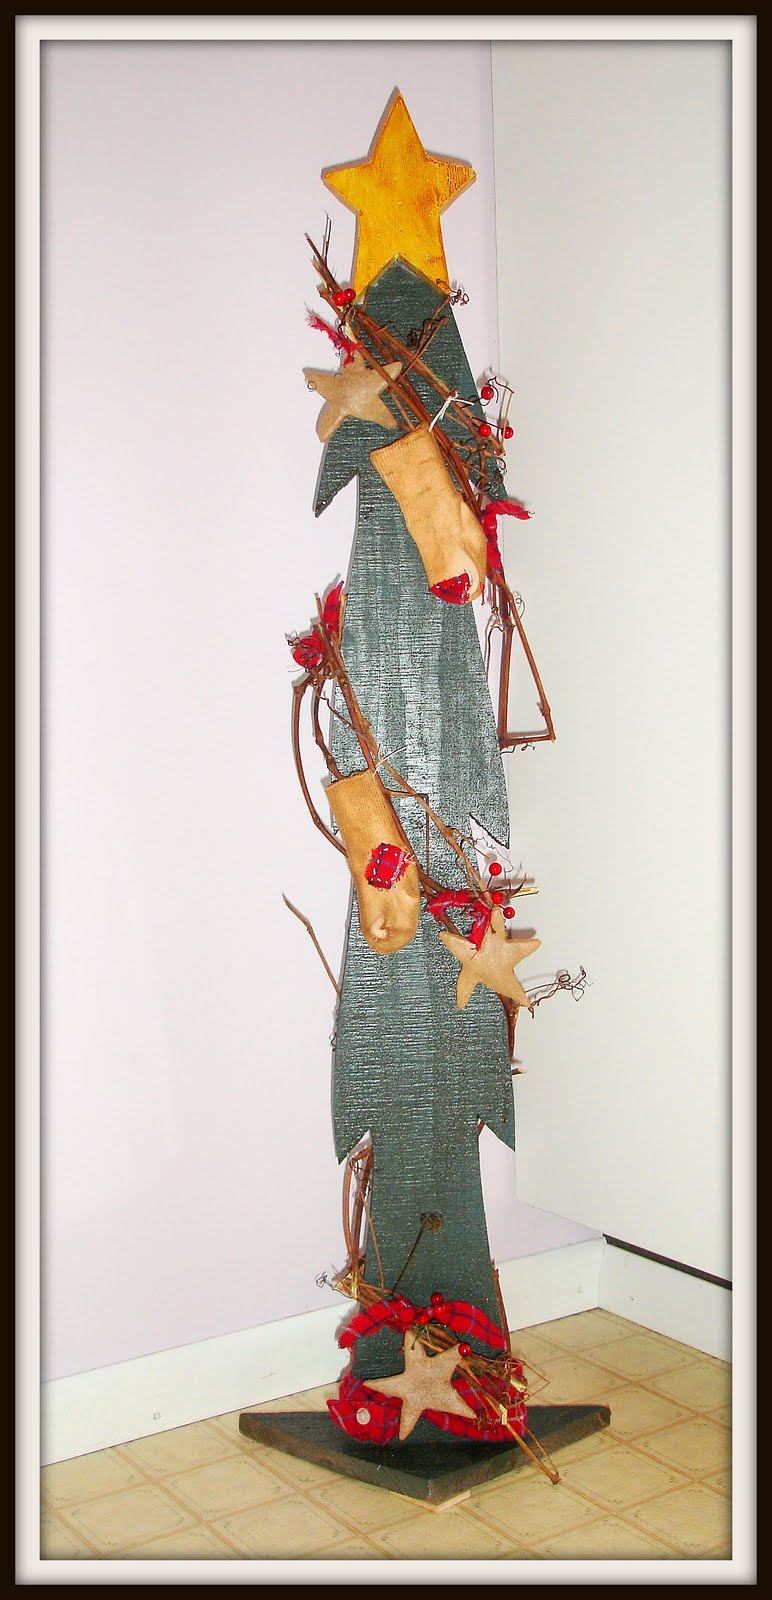
Isn't this little tree sad? I found it one day while I was shopping with my cousin at Goodwill. It was calling out to me to be rescued from the hum drum life that it had been living. So I purchased it and brought it home. It got a little bit of paint, a little shoe polish, and some stain that I found in the garage. So here it is all dressed up ready to go. It is going to the craft show this weekend where I hope it finds its new owner.

December 2, 2011

Christmas Tree Skirt

This is my first Christmas at my own place, with my own Christmas tree and decorations, so naturally I would need a Christmas tree skirt. I was fortunate enough to find a tree skirt lining and a large piece of holly print material in my mother's sewing room. I used the lining as a pattern for the holly print. Once both the top and bottom were cut out I ironed the seams open and sewed the right sides together leaving a small opening to pull the material through.


Skirt lining.
Skirt top.
Then I pulled the material through the opening, turning the right side out, and ironed the seam.

Ironing the seam.
Next I pinned ribbon loops along the slit in the skirt. I top stitched around the whole skirt, up the slit, and closed the opening left for turning.

Top stiching along the outside of the skirt.
Now all the skirt needs is three decorative buttons alined with the ribbon loops to create the closure.

Finished product!


Our beautiful Christmas tree.

December 1, 2011

Advent Is Here

Hello all, this is Sheryl, one of the mommas, Mom to Marissa and Krista and daughter to Helen.
Over the years one of the family crafts that we have enjoyed has been the advent wreath. Some years it has been a real wreath. Some years it has been an odd shape or unique material. The main requirement was that we all slow down enough to meditate for a bit on the real meaning of Christmas. This year I didn't have small kids to "help" make the wreath or give input so I got crafty on my own. While I listened to the old and familiar scripture and songs of the season I thought about Emmanuel, God With Us. With out being weird I just sort of saw what I wanted to make while I was singing Emmanuel. I didn't really think about it, I just could see a vision of what I wanted to make. I hope that it will be an encouragement to you and those that enter our home during this season.
I started by stenciling the letters onto a piece of corrugated white plastic that I had at the house left over from another craft project. Then I cut the letters out with a combination of scissors and Exacto knife.

Next I spray painted the word white just to freshen it up a bit and painted on some silver glitter.


When it was dry I added it to the mantel arrangement. I have it arranged to be our Advent "wreath" The Christ candle is in the center of the mantel and you can see it in the middle of the word.