Pages

July 20, 2013

Poppin' Tags

Last month my mother-in-law and I tried to go garage sale-ing. Other than the good company it was a complete and total bust. Even though we started early on Saturday most sales in her area ran Thursday thru Friday (who exactly do they think has money and the time to shop on a weekday morning?) and it started to rain (the sure end to any good sale-ing).

But don't fear, my thrifty mother-in-law knew of an (in door) church rummage sale. And it was BAG DAY since it was the last day of the sale. We started sharing one bag but ended up needing a few which was a steal at $5/bag! I came home with three dresses including the one below that you previously saw in my neon floral dress re-do, a red floral dress that needed a little bit of mending, and a gorgeous chocolate velvet evening dress.
Neon Floral Dress - Before

Neon Floral Dress - After

Red Floral Dress - Express

Red Floral Dress Bust - Express

Chocolate Velvet Evening Dress with Rhinestone Trim - Front

Chocolate Velvet Evening Dress with Rhinestone Trim - Back

Chocolate Velvet Evening Dress with Rhinestone Trim - Back Cut Out
Since I will be moving soon I also took the opportunity to check the local Goodwill one last time. There I found I cute tennis skirt (if I have one I'll start playing, right?), a pair of gray flats, and a pair of white high heel sandals. Love my finds!

Black Tennis Skirt - Fils

Gray Flats - TJ Maxx

White High Heels Sandals

Nailed That Bargain


I just got 5 nail polishes for $3.71. Here's how: I had $3.50 in store credit, I had a coupon from the "Retail Me Not" app for 3$ off 10$ and Ulta has their nail polish on sale right now for $2 a bottle. I honestly like their nail polish too! My nails in the picture are painted in "Lav-ish" by Ulta. It's mature, but has a golden shimmer that makes it totally summer-y 

Go get yours girls!! 

July 17, 2013

Springy-Summerish Teal Gel Polish

Hello All, 
These pictures are from earlier in the spring when I wore this color. As you will see in this video I did them slightly different this time. 

I purposefully recorded the video so I didn't have to type, so without further ado, ENJOY!

July 16, 2013

Another Two-fer

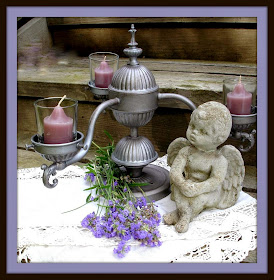
 This story starts with a garage sale FREEBIE. The best price evah! We were ready to leave a garage sale when I spotted a free chandelier. I remembered having seen a Pintrest post about using the globes in your garden so I grabbed it up. My husband no longer asks questions. He just prepares to be amazed later on.


You can see it was a very 1970's type thing and just needed some love.


I removed the globes from the chandelier and inserted skinny solar lights. If you look really closely you can see that I needed to choose the next size smaller light. I really like the effect in the garden at night. It is so hard to get a good photo at night you will just have to trust me on that one. That process must have taken a minute or two. Seriously, you put the globe where you want it and insert solar light stake and attach solar light. Done.


Well of course that left the metal part of the frame and  no left overs can go to waste so.... I had to start turning the rest of it into something. Then my memory kicked in of another Pintrest post. I didn't repin those posts because I didn't think I would ever actually do them. Sorry I can't link back to those original ideas.

 I took all of the electrical fixtures and electric wires out of the lamp. Then I turned the whole thing upside down so that it set flat on a table.

I painted the entire piece silver. I chose the Hammered Silver paint because I thought it would help cover any of the little blemishes that the lamp's original paint might have. I was very pleased with the results. When the paint was dry I wiped some gel stain over it to give it an appearance of age. I added votive cups and candles and have a new center piece. I enjoy getting crafty with free items and using what I have on hand at home to create something new.


July 14, 2013

ETSY ONE-DAY SALE

I was thrilled when a friend recently saw my Etsy shop, Sew Help Me by Marissa, advertised on her facebook page! Check out the highlighted box below.


If you're interested in purchasing an item from my Etsy shop you better get it fast, my shop will go on vacation after tomorrow. Until then use coupon code: ONEDAY to get 10% off any Sew Help Me by Marissa item!

July 6, 2013

Grab N Go Breakfast

What to eat for breakfast when you are allergic to wheat, corn, soy..... ummm.


Well I turned to my trusty friend Pintrest and found this really smart breakfast cookie. I have used the recipe quite a few times, including the time I left it in the oven for 1 1/2 hours. (NOT RECOMMENDED) That will be a whole different post.


I have had a few different combinations that have been nice. It is best to use VERY dark bananas. They taste sweeter, and are more moist, which helps the cookie stay together better. Here is an example of what I mean by very dark.


I have used the recipe just like it says and like it quite well. On another occasion I used pumpkin puree instead of banana, then I added pumpkin seeds and pumpkin pie spice, as well as a bit of Maple Syrup that my crafty brother makes. Yummy! I think that will be a new autumn favorite. Today I tested adding in about 1/4 cup of sunflower butter and sunflower seeds. Those are the darker cookies in the back of the picture.

These treats keep really well in the frig. I am planning on sealing them in the Food Saver for storage in the freezer. They have never been around long enough to try that yet.

Add a Greek yogurt to this cookie and an organic juice and you have a nice breakfast.

July 4, 2013

Sparkler Safety


Hello again. I am going to take time to be a bit of a mom. Our family has loved sparklers for at least three generations. I am sure there are many out there that can say the same. My crafty mother was always concerned about the safety of her little ones once the sparkler was spent. We always were barefoot,  that is the freedom of  summer. To keep us safe before we started with the sparklers she always had a recycled/re-purposed glass jar set out. We were instructed to drop the hot wire into that jar when our sparkler went out. She had a lot more fun with her kids not wondering who was going to get burned on those crazy hot wires. Thanks mom for that safety tradition.

Now I know you are wondering about this one. My older sister has a special needs daughter. That daughter loves sparklers, but instinctively knows that you should not have fire that close to your hand and won't touch them once they are lit. In order to fix that problem my crafty older sister sticks the unlit sparkler into an old corn cob then proceeds to light it. (Can we say farm crafty?) The corn cob is long enough so that the fire isn't too close and it acts as an insulator against any heat that might scare her daughter. 


This is the suburban adaptation of the corn cob. I chose a cork and a glass jar combo to emulate the corn cob theory. Any jar/cork combo will work. Look around your home and think outside the box. 
Be safe and have a spark-lie summer.


July 3, 2013

Happy Independence Day


I have been seeing wreaths on Pintrest and in magazines with "poofy" net that I think are very attractive. I am  not willing to spend money for the net so I have created a crafty way to get a similar look with what I already have available.

Here I am back at it with  recycling the red net that fruit and onions come in. I think that stuff is indestructible and I don't want it in a landfill, so I find creative ways to use it. This is one example, and I have used it other ways in the past. You can see one way here.

I started my wreath with a pile of red net. It isn't all the same shade of red or same texture so I will be aware of that in construction and mix the color and texture for the most pleasing look. The frame of the wreath is the wire rack that sits down inside of the water bath to hold your canning jars when you are home canning.

I trimmed both ends of the net to get rid of any stitching or paper tags. I was left with a tube shape of net. I gathered that together like you would a sock before you put it on your foot. I slipped a small piece of wire through and attached it to the frame and just kept adding till I was out of net. One tip my crafty dad taught me was to make a small hook at one end of your wire before you try to attach it. That makes the joining process much simpler.

 I found this little item at a local tag sale and knew it was going to be crafted soon enough. Well today was the day.Good price don't you think?

To finish the wreath I added the flag front and center, and nestled some sparklers into the net for added interest.  I was pleased with the look and the final product. If you are feeling crafty and would like to try another patriotic craft you might like this one, or this one.


July 1, 2013

We're Moving!

(Not the blog, Paul & I!)

Paul and I are moving out of state for his master's program. Its hard to believe that we are already leaving our first place and at this time next month we will be nearly settled into our new place. That to say, I will be VERY busy finishing up work work, packing the house, etc. and you may not hear from me as much this month. Next month be on the look out for home type crafts as I settle into our new place!

Paul's bummed face!